|
|
|
|
THE WORLD CAMELOT FEDERATION OFFICIAL RULES OF FOUR-HANDED (PARTNERSHIP) CHIVALRY
© 2009-2012 Michael Wortley Nolan and the World Camelot Federation
PLAYERS: The game of Four-Handed (Partnership) Chivalry is played between two opposing teams, each team composed of two players. The four players are called Red, Green, Blue, and Yellow. Red and Blue are partners on one team, Green and Yellow are partners on the opposing team. The players’ positions, moving clockwise around the four sides of the Chivalry Board, are Red, Green, Blue, Yellow. The four players make moves in the following repeating order: Red, Green, Blue, Yellow.
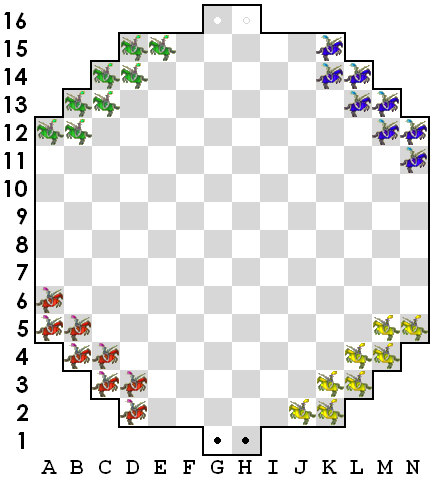
PLAYING SURFACE: The Chivalry board contains 176 squares of identical size. Ranks are rows of squares, numbered 1 through 16, running horizontally from one side of the board to the other. Files are columns of squares, lettered A through N, running vertically from one end of the board to the other. The squares of the board, with their actual Camelot designation used for game notation, from the bottom rank to the top rank, from the left-most file to the right-most file, are: G1, H1, D2, E2, F2, G2, H2, I2, J2, K2, C3, D3, E3, F3, G3, H3, I3, J3, K3, L3, B4, C4, D4, E4, F4, G4, H4, I4, J4, K4, L4, M4, A5, B5, C5, D5, E5, F5, G5, H5, I5, J5, K5, L5, M5, N5, A6, B6, C6, D6, E6, F6, G6, H6, I6, J6, K6, L6, M6, N6, A7, B7, C7, D7, E7, F7, G7, H7, I7, J7, K7, L7, M7, N7, A8, B8, C8, D8, E8, F8, G8, H8, I8, J8, K8, L8, M8, N8, A9, B9, C9, D9, E9, F9, G9, H9, I9, J9, K9, L9, M9, N9, A10, B10, C10, D10, E10, F10, G10, H10, I10, J10, K10, L10, M10, N10, A11, B11, C11, D11, E11, F11, G11, H11, I11, J11, K11, L11, M11, N11, A12, B12, C12, D12, E12, F12, G12, H12, I12, J12, K12, L12, M12, N12, B13, C13, D13, E13, F13, G13, H13, I13, J13, K13, L13, M13, C14, D14, E14, F14, G14, H14, I14, J14, K14, L14, D15, E15, F15, G15, H15, I15, J15, K15, G16, H16.
KNIGHTS: Each player begins the game with eight Knights. The starting positions are: Green Knights on A12, B12, B13, C13, C14, D14, D15, and E15, Blue Knights on K14, K15, L13, L14, M12, M13, N11, and N12, Red Knights on A5, A6, B4, B5, C3, C4, D2, and D3, and Yellow Knights on J2, K2, K3, L3, L4, M4, M5, and N5.
THE PLAIN MOVE: A Knight may move one square in any direction (horizontally, vertically, or diagonally) to any adjoining unoccupied square.
THE CANTER: A Knight may leap in any direction (horizontally, vertically, or diagonally) over a friendly (his, or his partner’s) Knight that occupies an adjoining square, provided that there is an unoccupied square immediately beyond it in a direct line onto which the leap may be made. This move is called a Canter. Knights cantered over are not removed from the board. A player may canter over more than one Knight during the same move, but may not make a Canter that ends on the same square from which it began. When cantering over more than one Knight in a move, the direction of the move may be varied after each Canter. A player is never compelled to canter, nor when cantering is he compelled to canter as far as possible.
THE JUMP: A Knight may leap in any direction (horizontally, vertically, or diagonally) over an opposing (either opponent’s) Knight that occupies an adjoining square, provided there is an unoccupied square immediately beyond it in a direct line onto which the leap may be made. This move is called a Jump. Each enemy Knight jumped over is captured and immediately removed from the board. A player is obliged to jump if any one of his Knights is next to an exposed enemy Knight. Having jumped over one enemy Knight, the jumping must continue as a part of that same move if the player’s Knight reaches a square next to another exposed enemy Knight. When jumping over more than one Knight in a move, the direction of the move may be varied after each Jump. If presented with capturing alternatives, a player may choose which opposing Knight to capture, and with which of his Knights to effect the capture. When compelled to jump, a player may, if he can, capture by a Knight’s Charge instead.
THE KNIGHT’S CHARGE: A Knight may combine a Canter and a Jump in a single move, called a Knight’s Charge. A Knight’s Charge must follow the order of first the Canter(s) and last the Jump(s). A Knight is never obliged to make a Knight's Charge. When cantering over more than one Knight during the cantering portion of a Knight’s Charge, the direction of the move may be varied after each canter. If the canter of a Knight brings it next to an enemy Knight that can be jumped, it must do so, unless by a different route later in that same move it captures one or more enemy Knights elsewhere. During a Knight's Charge, the directions of the last canter and first jump need not be the same. Having jumped over one enemy Knight during the jumping portion of a Knight’s Charge, the jumping must continue as a part of that same move if the player’s Knight reaches a square next to another exposed enemy Knight. When jumping over more than one Knight during the jumping portion of a Knight’s Charge, the direction of the move may be varied after each jump.
NOTATION: The Plain Move is indicated by the notation “-” placed between the starting square and the ending square, e.g., C8-D9. The Canter is indicated by the notation “-” placed between the starting square, landed upon intermediate squares (if any), and the ending square, e.g., E6-C8-A8. The Jump is indicated by the notation “x” placed between the starting square, landed upon intermediate squares (if any), and the ending square, e.g., H4xJ4xL6. The Knight’s Charge is indicated by the notation “-” placed between the beginning square of the cantering portion, landed upon intermediate squares (if any), and the ending square of the cantering portion, and the notation “x” placed between the ending square of the cantering portion (the beginning square of the jumping portion), landed upon intermediate squares (if any), and the ending square of the jumping portion, e.g., F6-F8-H8xH10xJ12.
LOSS OF ALL OF ONE PLAYER’S KNIGHTS: If one player loses all of his Knights, his partner may fight on, but each succeeding turn of the player with no remaining Knights is a pass-turn.
OBJECT: The game is won if a partnership captures all of its opposing partnership’s Knights.
ILLEGAL MOVES: A player who makes an illegal move must retract that move and make a legal move. If the mistake is only noticed later on, the game must be restarted from the position in which the error occurred.
|