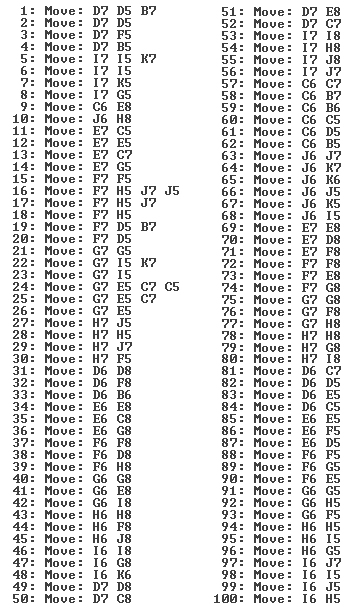
THE CAMELOT OPENING


Until recently, there were few recorded games of Camelot available for study.  Therefore, any thorough analysis of the Camelot opening (as well as the middlegame and the endgame) depends upon an increased level of game play.  The recorded games on this website undoubtedly can provide some opening ideas, but much further study is obviously needed.


Following are four brief thoughts on the Camelot opening; the first is some brief analysis of the 100 possible first moves, the second, from 1930, is a description of general opening principals, the third, also from 1930, is a description of three openings, and the fourth is a magazine article from modern times.


Listed below are the 100 possible first moves (50 distinct moves and their 50 right-left reflections).


With correct responses by Black, fourteen of these one hundred opening moves by White immediately lose material: C6-B7, J6-K7, D6-D8, I6-I8, F6-D8, G6-I8, D7-D8, I7-I8, E7-D8, H7-I8, E7-E8, H7-H8, F7-G8, and G7-F8.

~~~~~~~~~


The following advice on opening principles is from the chapter on Camelot from the 1930 book Games For Two by Mrs. Prescott (Emily Stanley) Warren.


The two armies lined up so near each other can “open fire” in numerous ways.  The usual opening is the forward play, either by canter or plain move in order to afford a better positioning of a Knight in the next move, or with a view to “filling in,” with other canters or plain moves, for a reorganization of the line, a strengthening of force upon one or the other flanks, or as a part of a campaign towards a drive at either wing or center of the opponent’s army.


~~~~~~~~~


These three "frequently used openings" are also from Games For Two by Mrs. Warren. 


  White   Black

1. F7-F8   F11-F9

2. D7-F7   E11-E9

3. C6-D7   G10-E8

  4. F8xD8   E9xC7xE5

  (See position below)


       Black

      White


  White     Black

1. H7-J7     H11-H9

 2. D7-F5-H7  J11-H11

3. F6-H8     C11-E9

 (See position below)


   Black

    White


  White   Black

1. H6-H8   E10-F9

     2. E6-G8   I10-G12-E10

3. J6-H6   C11-E9

  (See position below)


       Black

        White


~~~~~~~~~


The following article was first published in 2002 in the magazine Abstract GamesPaul Yearout, its author, is one of the few expert Camelot players in the world.  The article has been edited by Michael Nolan only to substitute official WCF notation for the abbreviated algebraic notation originally used by Dr. Yearout.


FIRST THOUGHTS ON CAMELOT OPENING PLAY

by Paul Yearout


Open spaces around the initial placement of Camelot pieces raise the possibility of a flanking attack—sending a small force scurrying around the enemy. Logistics quickly discourages that notion. The defender has shorter paths to deploy impeding troops, while the erstwhile attacker, with pieces tied up in supply lines, has a reduced army to fend off the opponent’s advance. So rare were such early attempts that only scores of frontal attacks remain.


Holey Wars


A cautionary tale: 1.G6-G8 E11-E9, 2.F6-F8 E10-E8, 3.D7xF9xD9 D10xD8xF6xH8, 4.I7xG9xE11 I10-G12-E10xE12 (This puts Black up by an exchange, though that need not be decisive.) [Editor's note: For a discussion of the exchange in Camelot, go here.] 5.H6-G7 C11-E11, 6.D6-E7 J11-I12, 7.E6-E8 H11-H9, 8.G8xI10 I11xI9 (Diagram 1).


 Diagram 1 – Position after 8....I11xI9


Black is tempting White with 9.J6-H6-H8xJ10, after which 9....I12-H11 yields a second exchange. 9.C6-D7 I12-H11, 10.J6-H6?? E12-E10-G12-I10-I8xG6xG8xE6xC8. This elicited the plaintive, "What have you done with my men?" White’s oversight may be somewhat excused by Black’s ninth appearing to be a defensive move in an early try at the game. The caution is that squares adjacent to pieces of both sides, such as F9, G9, H8 or I8, demand careful scrutiny.


Notational aside: Traditionally, a number was printed on each individual square for record-keeping purposes—the algebraic system used in these articles was only recently adopted officially by the World Camelot Federation. The 1930 rules state that the board numbering has no significance other than record-keeping. Despite that, it can be otherwise used. Parity refers to the evenness or oddness of an integer. Within the central 10x12 rectangle (extending from A4 to L13) a canter or jump maintains parity, as well as square color. Considering the position after 9....I12-H11, the square I8, numbered 87 (in one orientation of the board), is not accessible to the knights at E11 or J6, they being on the wrong color, nor to the knights at D7 or H11, which, while correctly colored, are even rather than odd. So either side can focus on E12 (35), as the pertinent knight of the position. Parity considerations can eliminate the drudgery of tracing paths or it can suggest moves to construct them. Moreover, if alpha-numerics are replaced by Cartesian coordinates (i.e. A ð1, bð2, etc.), parity applies to each coordinate individually anywhere on the board.


After 9....I12-H11 the squares F6 and G6 may be thought of as holes in the White forces, hazardous for White and adventitious for Black—if Black can get a knight to H8 or J8 (which are adjacent to pieces of both sides), he can make a capture.


Diagram 2 shows a game position, White having just moved 11.I7-G7-E9, adding a hole at I7 to the one already present at G7. Black, contrariwise, has what I call a U-hole (because of the shape of the surrounding pieces) at E10.


 Diagram 2 – Position after 11.I7-G7-E9


Black may have been considering an end-run, for the game continued as follows: 11….J11-K11?, 12.E8-E10 D11xF9xD9, 13.E6-E8xC10xC12xE12xE10xC10.  Rather than ending White’s thirteenth move with ...E10xC10, 13.E6-E8xC10xC12xE12xE10xG12 H11xF13, 14.E7-G9xE11xC9 increases White’s advantage with a forcing move.  Black’s missed opportunity was 11….G11-I11!, 12.E9xG11xG9 C11-E9xG7xI7xK7xI5xI7. White might try 12.E7-G9xG11 in the hopes of drawing off F10, but 12....I10-G12xG10 or I10-I12-G10xG12 allows complete devastation of the White army.


Next, in two moves Black makes three holes: 1.D6-F8 H11-H9, 2.I6-G8 F11-F9 [Diagram 2a added by the Editor].


Diagram 2a – Position after 2.... F11-F9


Although White did not take advantage of 3.E7-G9 F10xH8, 4.F8xF10xH12xJ10xJ12 H8xF8, 5.F7xF9xH11xJ9, Black only lasted a dozen moves anyway.


Forceful Dealings


The last game also illustrates the power of forcing an opponent’s captures, which sometimes results in a free move as well. To follow that line of thought, look at the following game: 1.C6-E8 E11-E9, 2.F6-F8 H11-F9, 3.H6-H8 C11-E11, 4.G6-G8 J11-H11, 5.J6-J7 F10-D8! (Diagram 3).


 Diagram 3 – Position after 5....F10-D8!


The man at F8 cannot take advantage of the hole left at F10 without leaving behind a more deadly vacancy. 6.E8xC8 E11-C9xC7xE5, 7.D7-F5xD5 D11-D9, 8.F8xF10xD8 D9xD7xF5 (Diagram 4).


 Diagram 4 – Position after 8....D9xD7xF5


A certain ambivalence goes with the man at F5. Materially, the forces are even, with relief of some initial tensions. Positionally, F5 has the potential for disrupting White later in the game. That menace can be reduced by threatening F5, say with D5-D6. Actually, F5 falls to H8-H6, nullifying the cleverness of Black’s fifth move. However, White gave Black a ruinous gift: 9.G7-F6?? E10-E9, 10.F6xF4 I10-G12-E10-E8xG6xI8xK6, leaving D10 and H11 poised for further devastation.


Finally, an opening using forced captures, with changes of fortune, and missed opportunities. 1. F6-F8 G10-H9, 2.E6-C8? H9-H8 (Why not 2....I10-G8xE6xE8xG8?) 3.G7xI9 (Why not 3.C6-E8-G8xI8?) 3....C11-E9xG7xI5xK7, 4.I9-H8 F11-D9, 5.C8-D8 (Why not 5.C6-E8xC10xE12?) 5....H11-H9? (Diagram 5).


 Diagram 5 – Position after 5....H11-H9?


6.F7-G7 (Why not 6.C6-E6-G8-I8xG10xG12? Black dare not capture G12 because of the Knight’s Charge from I7. Incautiously retreating 6....H10-H11 gives White the free move 7.F7-F8 for a different charge from I7.) 6....K7-L6, 7.E7-C9 (Still, why not 7.C6-E8xC10xE12? Least damaging is 7....D10-F12xD12, leaving D7 two ways to capture three pieces.) 7....D10xB8, 8.D8xD10xF12 J11-H11-F11xF13, 9.I7-G9xE11xE9 B8-A7, 10.E9-E10 D11xF9, 11.C6-E8xG10xG12xE14 L6-K5, 12.D6-D8 K5-J4, 13.D7-D9 H9-G9, 14.H8xF10 I10-G10xE10xC8xE8, and Black took twenty-six more moves to win.


Closing Thoughts


While not a technical game-theoretic term, delicate is quite descriptive of Camelot—small oversights or apparently innocuous moves can have dire results. Of nearly thirty opening scores, only two come out with equal forces, another five with numerical equality, but with fewer knights on one side, and the rest with sometimes drastically imbalanced forces.  [Editor's note: Actually, of the one hundred first moves by White, fourteen result in drastically imbalanced forces.]


All pieces having equal value in castling, a gain of one piece, whether man or knight, can be hoped to be a winning edge, unless position outweighs material. An old Chess adage becomes applicable: when ahead, trade.


Less significant may be the chessic emphasis on the center of the board, though there is a tendency toward the center among these openings.


A few highly tentative Camelot maxims suggest themselves: fill holes quickly, as with E6-E8, C6-E6 or E6-G8, C6-E6. F6-F8 was another opening choice, though never followed by J6-H8-F6, likely as good as E6 for positioning a knight. Directly attack the enemy with extreme caution, fearing the free move. Remember that even remotely positioned knights can travel fast. Seek early trades.


Despite Camelot’s age the level of play remains primitive. Many more well-played games must be examined before more useful insight will appear.